Thursday, 23 August 2012

The Rapunzel Tower Birthday Cake


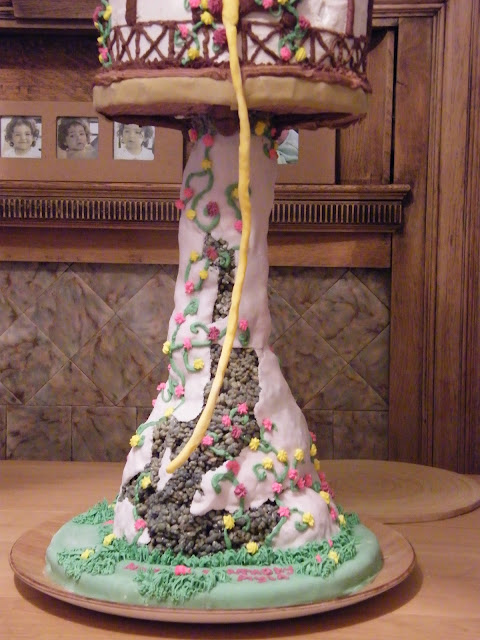
Time goes by so quickly.  It's hard to believe it has already been a year since my Daughter's 3rd Birthday.  And now here I am planning her 4th.  That cake will have to wait another week to be revealed. Her party is September 1st. But as I've been thinking about how to put this project together I thought I would share with you last years cake.  A Rapunzel Tower Birthday Cake.

The inspiration for this cake was easy.  Here's a photo of Ayla just a few weeks before her birthday.  It had to be Rapunzel.


"Mom, look at my long lovely hair"


We have watched that film more times than I can count and the first thing I was drawn to was the beautiful tower.  To make this cake I had to have a stand that would support the structure yet be somewhat invisible.  I had my husband make one for me.  The bottom was a 14in round board and the top was a 10in round board connected by a long wooden pole which he used nails and glue to hold together to ensure it was all stable and secure.  Please forgive my lack of pictures but at the time I hadn't started blogging and never took photos of projects as I was working on them.  But below is an image of what the stand should look like.  
Once you have your stand the rest if realtively easy.  I used a 10in Round Cake for the House part of the tower.  I cut out a small square for the window.  I used Rice Krispie Treats tinted a stone colour with a little food colouring and built them up around the centre of the stand to make up the tower.  I also used Rice Krispie Treats to form the roof of the House.  I used green fondant to cover the board for the base of the tower and white fondant to make up the partial plastering effect on the walls of the tower and piped buttercream vines and flowers trailing up the tower.  For the House I decided to ice and decorate in buttercream and only used fondant to make up the roof tiles and decorations.

The biggest challenge for me came when it was time to make Rapunzel.  I just don't like making fondant models and I really wanted it to look like Rapunzel. My solution was to print out a picture of Rapunzel and to press it into a piece of fondant molded to look like her hair.  I rolled the long piece of fondant (hair) around a piece of craft wire to give it support so it would not break off from the weight.


And here it is.  Ayla's 3rd Birthday Cake.


The Birthday Girl


Getting Ready to Blow out the Candle


Tuesday, 21 August 2012

Hey Diddle Diddle

Hey diddle diddle the cat and the fiddle, 
the cow jumped over the moon.  
The little dog laughed to see such fun
and the dish ran away with the spoon.


When my sister in law called me about doing my nephews 1st Birthday Cake I was so excited.  I knew right away that I wanted to do a Nursery Rhyme Cake and she was kind enough to give me free reign with the design.   I wanted this cake to have a story book effect.  After painstakingly stalking the internet for ideas I came across the Hey Diddle Diddle motif Baby China from my old employer Tiffany & Company.  I instantly loved the characters and decided this was it.

I printed off and cut out the images then traced them as best I could onto my fondant.  Then painted the cutouts with dusting powders mixed with a bit of vodka.  I then placed each cut out onto a round fondant plaque decorated with cloud and moon motifs as if the characters where all floating in the sky in a child's dream.  I used a black food colouring pen to trace over the cutouts to give it a story book artwork feel.

The biggest challenge for me with this cake was the writing.  The cake itself was mostly buttercream apart from the fondant plaques so the writing needed to be piped buttercream.  Unfortunately piped writing is not one of my strong points and as an additional challenge the writing needed to be spaced perfectly to fit right around the cake.  To do this I made a template in powerpoint and used wordart to type the nursery rhyme in a circle.  I then drug the circle to the size it needed to be to fit my cake and lastly inverted the image before printing it out.  I then placed a piece of parchment paper over the printout and piped the design onto the parchment paper in the same colour as my iced cake.  I then turned the wax paper over and aligned it on top of my cake, piping side down.  Then used a brush to gently trace over the writing and then lifted off the parchment paper.  This transfers the writing from the parchement paper onto the cake.  Once the transfer was on the cake I then over piped the message in yellow. The only thing I would change is once it was done I wished I had chosen black for the writing.  But it was so time consuming up to that point I wasn't about to do it over just to change the colour, so yellow it is.

Overall I was very pleased with the outcome and since we went to this party I can honestly say it tasted lovely as well.  If you are looking for an incredible tasting sponge try Jane Ashers recipe found here. Follow the instructions to the T and get ready for a treat.  My mouth is watering just thinking about it.